Showing posts with label Spring. Show all posts

4/20/2011

Chick Pancakes

How about some "newly hatched" Chick Pancakes for Easter Breakfast?
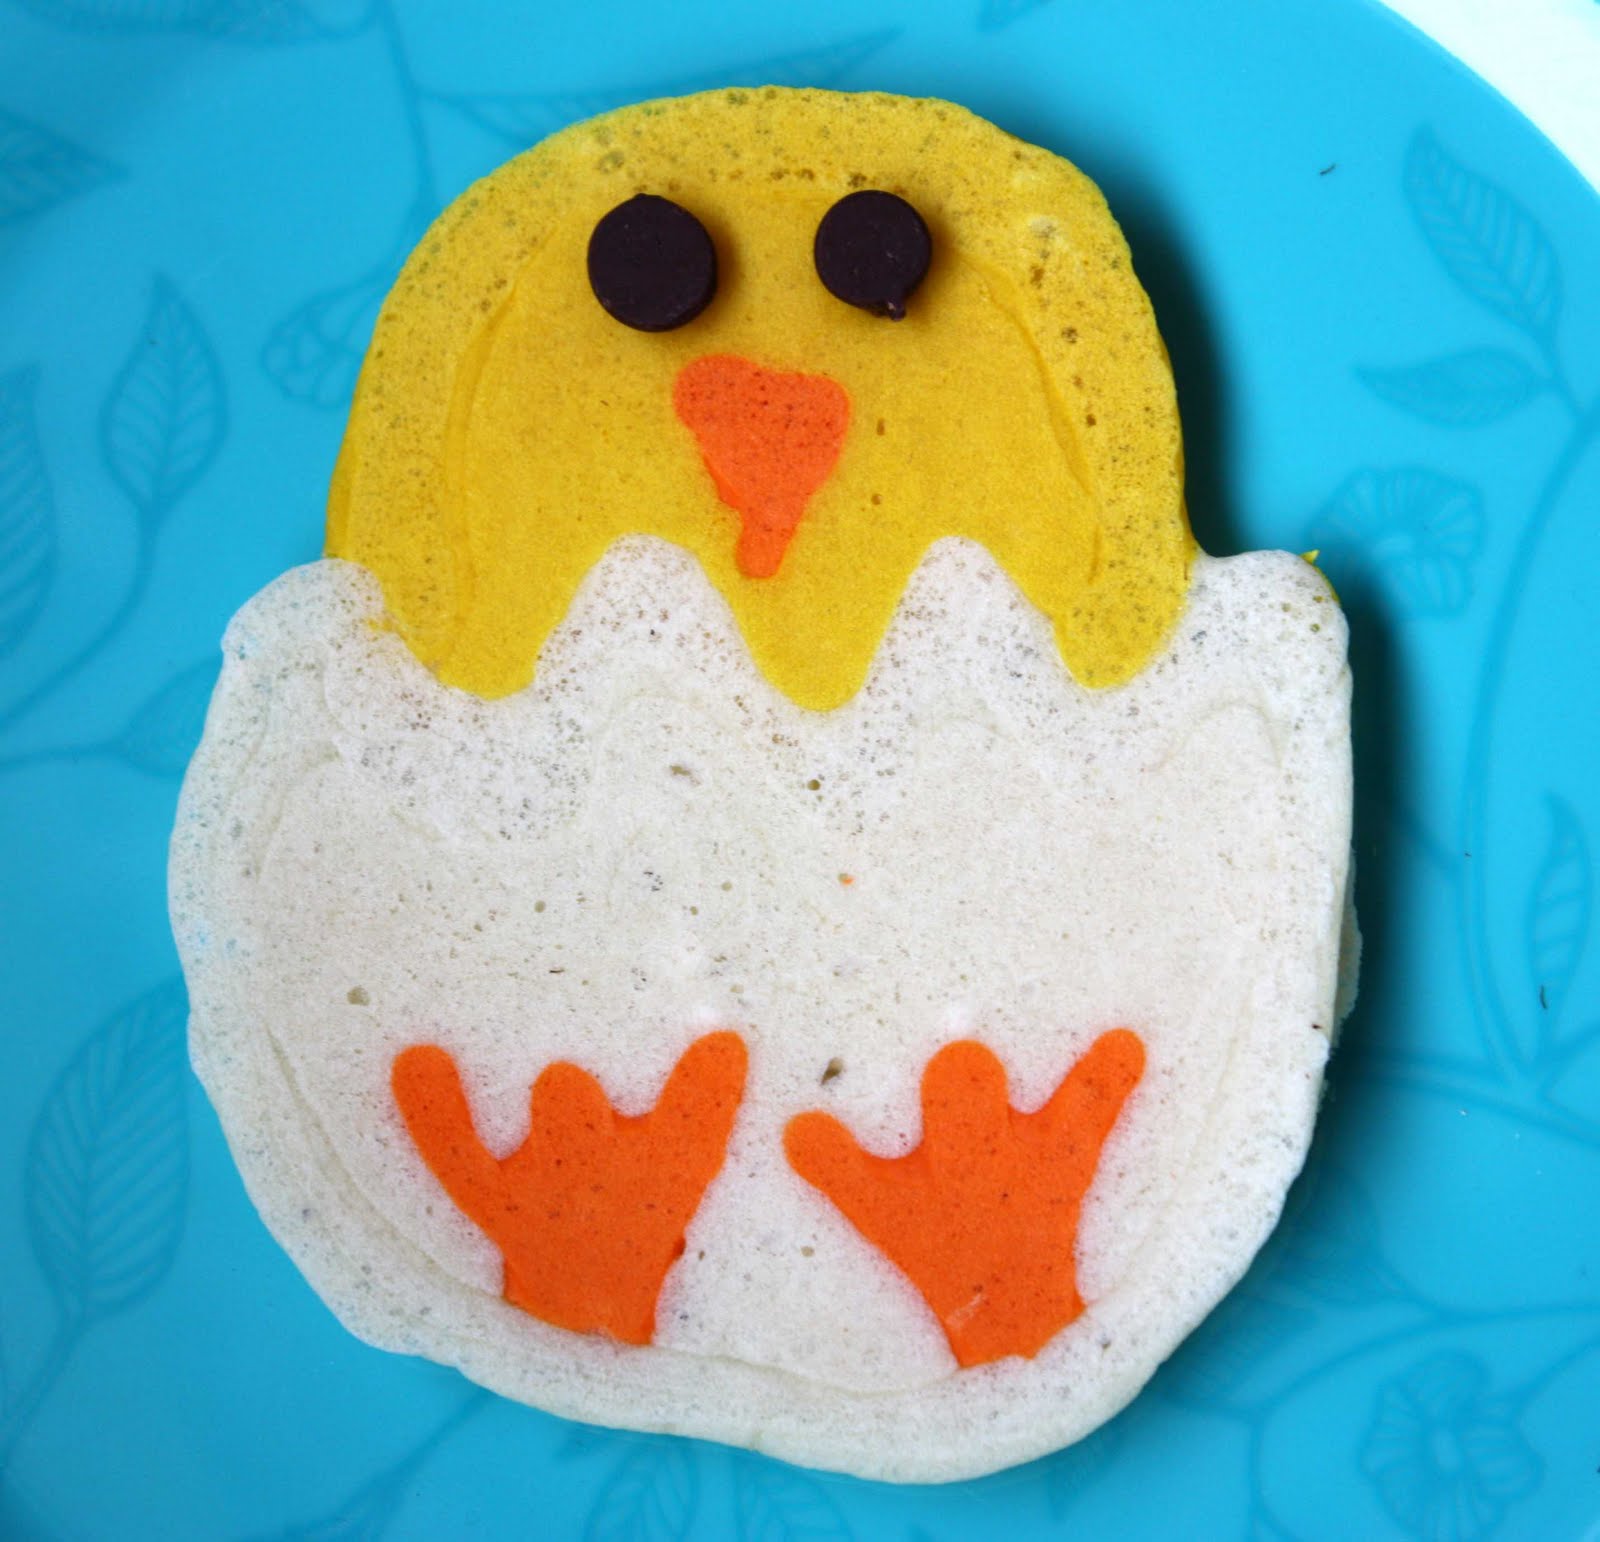
They are so simple to make, the two secrets are to make sure that your pancake batter is nice and smooth (I like to make it in the blender), and you'll need three of these squeeze bottles...
Chicky Pancakes

Ingredients:
Your favorite pancake batter
3 plastic squeeze bottles
orange and yellow food coloring
chocolate chips (for eyes)


Directions:
Pour batter into squeeze bottles, about 3/4 full. Add a few drops orange food coloring to one bottle and a few drops yellow food coloring to another bottle. Shake both well.

Over medium heat (make sure that you only use medium or medium/low heat...it will keep the "egg" part of your chick white and still cook it), draw a cracked egg outline with white batter then add a half circle of yellow for the "head". Draw a triangle beak and feet. Let cook until just starting to bubble. When your outline starts to bubble, fill in with white and yellow batter...

When entire pancake starts to bubble, flip and cook on the reverse side (about 60-90 seconds).

Remove from pan and add two chocolate chips for eyes (my kids each wanted a little pile of chocolate chips on their plates to add their own eyes). Serve immediately.

We had fun playing with the extra batter and even made a few "easter eggs" to go along with the chicks. I hope you're having some fun family time this weekend! Happy Easter!

3/25/2011

Fluffy Bunny Cakes

Spring is in the air and Bunny Cakes are everywhere! You will LOVE this white chocolate cake mix fix with fluffy marshmallow icing! The best part? One cake mix will make three bunnies! That means this year there will be enough ears for everyone. :) Everyone has felt the pinch of the economy in one way or another. This year, instead of spending a lot of money on expensive table decorations, how about whipping up a family of these bunnies to serve as centerpieces AND dessert?
Fluffy Bunny Cakes
Cake
1 box Betty Crocker white cake mix
1 box (3 oz) instant white chocolate pudding
2 cups sour cream
5 eggs
1 cup melted butter
1 tsp vanilla extract
1 cup white chocolate chips

Icing
3 cups sugar
1 cup water
3/4 tsp cream of tartar
1/4 tsp salt
6 egg whites
1 tablespoon vanilla extract
Food coloring, optional

Garnish
3 large red gumballs
3 large marshmallows
6 round malt chocolate candies

Directions:
Heat oven to 350°F. Spray or grease bottom of three 9 inch round cake pans.

Combine all cake ingredients except chocolate chips in large bowl. Mix until well blended. Fold in chocolate chips. Divide batter among three greased cake pans (make sure to use three pans or your cakes will overflow!).

Bake for 25-30 minutes, until toothpick inserted into center of cake comes out clean. Remove from oven and turn over on wire racks to cool completely.

In a medium pan, combine sugar, water, cream of tartar and salt. Cook over medium heat until just boiling, stirring occasionally.

Place egg whites in large mixing bowl. Turn mixer on high and continue to beat while slowly pouring in hot sugar mixture. Beat until fluffy and glossy, about 7 minutes. Add vanilla.

Separate icing into bowls and color as desired.

When your cakes are cooled, cut in half. Use one half for the bunny face. Cut ears out of the other half, as shown below. One of the ears is longer, so don’t worry! Cut off the top and flip over to form a “folded ear”.
Divide icing into bowls and color as desired. I like to reserve 1 cup white for ears then tint three bowls pastel pink, yellow, and blue. Or, you can make your bunnies whatever colors you want to match your party!
Frost generously, using your knife to make peaks in the icing. Note: once the icing sets, don’t mess with it! You’ll ruin the smooth gloss. Use candies to create a bunny face, as below.

4/12/2010

Peter Rabbit's Garden Snack

Today we had fun and easy
Peter Rabbit's
Mixed-Up Garden Snacks

and the kids loved them! The cards I made up are
here for you to print.

In case you can't download the cards, they say:
"Peter Rabbit’s seeds got all mixed up this year and now he doesn’t know what has grown in his lovely garden! Will you help him eat his yummy treats and figure out what they are? Help Peter by digging in each hole, nibbling the food, and deciding what it is. Use your taste, smell, and sight to figure out this mystery! Good luck!"

Peter Rabbit's Mixed-Up Garden
Ingredients:
-a cupcake pan or mini-mufifn tin
-various fruits & veggies, cut into bite sized pieces
-tissue paper
-tape
-Peter Rabbit's Mixed-Up Garden cards

Directions:

Fill cupcake or mini-muffin tins with various fruits and veggies. Cover with a sheet of tissue paper and tape down to secure. Two layers of tissue works best (just fold a piece in half) so no one can peek!:)Print the Peter Rabbit's Mixed-Up Garden cards, fold in half, and place with the muffin tin. Let the kids "dig" and discover what yummy treats are in the "garden"!

At the end of this week I should be posting the details on how you can enter the Lip Smackin' Healthy Food Cookoff! We have some great prizes and I can't wait to get started!

3/29/2010

Rabbit Hole Pancake Stacks

Hi everyone! I've been spending most of my time working on Paula Deen's Real Women of Philadelphia contest. I am dying to be a finalist, fly to Savannah for the cookoff, and meet my hero, Paula herself! Wish me luck & you can join in on the fun, too! Go here for details.

Even though I'm focused on my dream-come-true cookoff, of course we have made time for some Easter fun in the kitchen. Here's a cute and silly breakfast that the kiddos (and adults:)) will gobble up.....
*Rabbit Hole Pancake Stacks*
Rabbit Hole Pancake Stacks
Serves 3
Ingredients:
9 pancakes (cooked about 5" in diameter, use any recipe or your favorite mix)
3 T. Peanut Butter
3 Ts. Jelly
8 oz. tub Whipped Topping, thawed
4-5 drops Green food Coloring
3 T. mini chocolate chips
2 Large Marshmallows
9 Toothpicks
Pink colored sugar (optional)
Bunny Crossing Signs (download and print here)

Directions:
You will need 3 pancakes for each rabbit hole stack. Yum!
To assemble, spread 1/2 T.peanut butter and 1/2 T. jelly on top of one pancake. Place second pancake on top. Spread 1/2 T. peanut butter adn 1/2 T. jelly on second pancake and top with third pancake. We used Peanut Butter & Jelly because my kids requested it, but you could use anything! Jam, flavored cream cheese, you name it! Mix whipped topping with a few drops green food coloring. Divide topping in 3 parts and spread over pancake stacks.
Drop 1 T. mini chocolate chips on top of each pancake stack to form a "rabbit hole"
Snip each marshmallow into 3 pieces. Dip one side into colored sugar (optional). Insert toothpick into each marshmallow and insert two of them into pancake stack to make your "bunny ears".
Print and cut out Bunny Crossing Signs. Tape to toothpicks and insert into pancake stacks. Serve immediately.

3/27/2010

Bunny Peep Pops

I saw the adorable chocolate covered Easter Peep Pops on Make and Takes and wanted to make our own version! We used white chocolate on top, edible eyes, and sprinkle noses. The girls made these all by themselves and did such a great job! Easy, cheap, and a fun class treat!
I love them just with edible eyes and a nose, but if you want you can use a food color pen (such as Americolor) to add features...
Bunny Peep Pops
Ingredients:
Bunny peeps
white chocolate
Sucker sticks
edible eyes
some kind of sprinkle or candy for nose (we used a large Wilton nonpareil)
Wax paper
Sucker bags (optional)
Ribbon (optional)

Directions:
Grab a group of your friends and get ready for some fun! This is the H family, some of our bestest buddies. See how Miss H came prepared with her apron? She's going to be a great chef!
Melt the chocolate and let the kids dip one side of the peep in it. Lay on wax paper. Add edible eyes, a nose (or whatever else they want). Dip a sucker stick in a generous amount of chocolate and push into bottom of peep to make the "tail" and adhere the sucker to the stick. Let sit to harden.
If you can catch them before they're gobbled up, you can wrap in sucker bags and tie with ribbon. Happy Easter!
I put out lots of extra sprinkles, mini marshmallows, and other fun goodies for the kids to use...we had some cute and silly bunnies!

1/15/2010

Gumball Flowers

We always have gumballs in the house (thanks to our 6' Wowie Zowie machine) so they're going to turn into colorful "flowers" this Valentines Day.These happy blooms would be perfect for a Valentines Day treat or a Tea Party.
Here are some of the "Valentines" that the girls thought would be appropriate to attach. I'm sure Hallmark will be calling any day...
"I'd always 'chews' you to be my Valentine!"
"If you were a flower I'd eat you."
"Roses are Red, Violets are blue, this flower's a gumball, it's for you to chew."

"Roses are Red, Violets are blue, Flowers are for girls but this one is gum so it's ok for you, too."

...I love kids.

Gumball Flowers
Ingredients:
Large Gumballs (1 inch)
Small Gumballs (8 for each flower)
Sucker Sticks
Royal Icing (recipes here)
green food coloring (optional)
Sprinkles
Wax Paper

Directions: Twist a pointed paring knife into each of the large gumballs to make a small hole. Mix a few drops of green food coloring into royal icing. (Royal icing recipes are here--it's the kind of icing that is very hard when dry). Spoon icing into a cake decorating bag or quart ziploc freezer baggie with a small corner snipped off.
Push sucker stick into each hole (you may have to add a dab of icing if the hole is too big). Pipe out a line of icing around each gumball as shown:

Place gumball on wax paper and push smaller gumballs into the icing to form the flower "petals".

Let dry completely or overnight.

Now, you could stop here, but I thought they needed a little extra sparkle, so after they had dried for an hour (but weren't completely set), I piped out a little circle of icing on the top:

and added sprinkles!

After icing is dry, you can wrap with sucker bags or celophane. Have fun!

8/27/2009

Chocolate Mousse Birds Nests

I wanted a gourmet/retro/artsy dessert for some company we were having. I also just learned that if you flash-cool chocolate (thank you, Jean-Pierre Wybauw), it is moldable for a few seconds. So I made some little chocolate "nests" and meringue birds for this fabulous mousse.
I know this looks involved, but nothing is extremely hard and it's a beautiful dessert.

Tip: make the birds up to 2 weeks ahead and keep in a sealed container or freezer. I used the extra birds on my girls' cereal in the morning to encourage quick eating. Little H was so happy, she called to Gourmet Dad: "Mom gave me the bird! Mom gave me the bird!"
Chocolate Mousse Birds Nests
Mousse Ingredients:
9 oz. bittersweet chocolate
3 1/2 Tbs. butter
8 egg yolks
2 cups heavy cream
4 egg whites
1/4 c. white sugar

Bluebird Ingredients:
2 egg whites
1/8 teaspoon salt
1/8 teaspoon cream of tartar
1/2 cup white sugar
Blue food coloring

Nest Ingredients:
high quality chocolate, your favorite flavor. (I used Cacao Barry dark chocolate)
quart ziploc freezer bag

Garnish Ingredients:
caramel or butterscotch sauce (homemade or you can use storebought ice cream topping)
green food coloring

Directions:
Bluebirds:
Preheat oven to 225 degrees F. Line 2 cookie sheets with parchment or silpat sheets.
In a large mixing bowl, beat egg whites, salt, and cream of tartar to soft peaks. Add a drop or two of blue food coloring. Gradually add sugar, continuing to beat until whites form stiff peaks.

Put mixture in a piping bag or a gallon ziploc bag with the end cut off.
Pipe out an oval on the parchment to make the birds "body". Starting in the middle of the oval, make a candy cane shape going straight up and pull away to make the beak (see video tutorial, it makes more sense!:)).

Bake for 1 hour in preheated oven. Do not allow them to brown. Turn off oven. Keep oven door ajar, and let meringues sit in the oven until completely cool. When making the nests, reserve a little chocolate to add "eyes" to the birds with a toothpick.

Nests:
If you have a marble pastry slab, put it in the freezer. If not, you can use a metal cookie sheet, it just won't hold the cold as long (you may need to put it in the freezer after each nest to keep it cold).
Melt chocolate slowly in microwave, 30 seconds at a time, stirring after each interval. Put chocolate in a quart-sized ziploc baggie and snip the end off.
On the marble slab or cold pan, quickly draw lines back and forth with your chocolate, about 8 inches long. They should set in a few seconds. Quickly gather them up and bend into a circle to form your nest. Place on a cookie sheet lined with wax paper and immediately put into the refrigerator to set completely.

Mousse:
Coarsely chop the chocolate and put in microwave-safe bowl. Melt chocolate slowly in the microwave at 30 second intervals, stirring after each. Melt butter and mix with egg yolks in a small bowl. Add egg mixture to the chocolate, stirring constantly to avoid curdling. Let mixture stand and cool a bit. Whip the cream to soft peaks.
Whip the egg whites to stiff peaks, adding half the sugar as your start whipping and the other half slowly as the whites come to firm peaks. Fold the cream into the chocolate mixture. Fold in the whites. Refrigerate several hours. Try not to eat it all before you serve it. YUMMMM!
Just before serving, place one nest on a plate. Combine butterscotch sauce with a drop or two of green food coloring. Put a few drops on each plate
then draw a knife through the dots, making them look like leaves.
Spoon or pipe in about 1/2 c. mousse and add a bluebird on top. Enjoy!
Here's a view of the whole plate. This was such a fun dessert to make!

8/26/2009

Painted Butterfly Dinner

Does anyone else have a hard time getting info from your kids when you want to know how their day went? I've found that my kids talk when involved with a project, so came up with this one for tonight. We had a great chat, they LOVED doing it (what kid doesn't like to paint their dinner?!), and dinner was a snap. Perfect!
Painted Butterfly Hot Dogs
Ingredients:
Hot Dogs
Refrigerator biscuits (like Grands or any brand)
1 egg
water
food coloring
pretzel sticks
cheese, ketchup, or mustard (for the face)
small paintbrushes

Directions:
Preheat oven to 350 degrees. Lightly spray a cookie sheet or cake pan. Give each child two biscuits and a hot dog.
Help them cut each biscuit in half, turn one half over, and place on pan as the "wings". Repeat with the other biscuit.
Lay the hot dog on top of the biscuits. Time to paint!
To make paints, put one egg and one tablespoon water in a small bowl and mix well. Pour a small amount of egg mixture in several bowls (however many colors you want) and add a drop or two of different food colorings. We went with blue, purple, and orange. One egg made plenty of paint, but if you have a big group of kids, you may want to use two.
Give each child a clean paintbrush and let them paint their "butterfly wings".
Have a great chat and enjoy some 'dinner-making family time'!
Bake at 350 for about 10 minutes, until biscuits are golden brown. Add two pretzel sticks for antannae and either ketchup/mustard/cheese/whatever you want for two eyes and mouth. Serve with a side of your favorite vegetable and dinner's ready!

Holiday Playlist

My grandmother hasn't been doing well...to cheer her up, I rounded up a few of my musical friends and made an album of Holiday songs fo...